
Dispersion of White Light and Lenses- Physics Guide for Class 8

Information about Dispersion of White Light and Lenses
Title | Dispersion of White Light and Lenses |
Class | Class 8 |
Subject | Class 8 Physics |
Topics Covered |
|
We can understand many natural phenomena in terms of the phenomenon of refraction. The twinkling of stars, the (apparent) early rising of the sun and the (apparent) late setting of the sun are some of these well-known phenomenon. We can understand them in terms of the refraction of light rays as they pass through the earth's atmosphere. This also means that astronomers, going well above the earth's atmosphere, will not observe any twinkling of stars. This is because there is no medium over there (It is all free space or vacuum above the earth's atmosphere). Hence, there would be no refraction there.

Dispersion of White Light by a Glass Prism
A prism is a piece of a transparent material bounded by two plane surfaces inclined at an angle. We generally use prisms having triangular faces.
It was in the year 1686 when Sir Issac Newton did his well-known experiments on passage of white light through a glass prism. He made a narrow pencil of (white) light to fall on a glass prism. The emergent light was received on a white paper/white screen. It was observed (on some adjustment of the prism) that there were seven colours appearing on the screen—violet, indigo, blue, green, yellow, orange and red (VIBGYOR) — the colours that we see in a rainbow.
A prism, unlike a parallel faced rectangular glass block, was not only deviating, or bending, an incident ray towards its base but was also splitting white light into seven colours. We call this phenomenon - splitting of white light into seven colours - as the phenomenon of dispersion of light.

In air, all colours propagate with (nearly) the same speed but in a material medium light rays of different colours propagate with different speeds. In glass, the speed of violet colour is minimum while that of red colour is maximum. Hence, a ray of red colour bends minimum towards the base of the prism while the ray of violet colour bends the maximum. This results in white light getting split into its seven constitutent colours - from red to violet.
Activity 1

- Take a plane mirror of a suitable size.
- Place it in a bowl as shown in the figure.
- Fill the bowl with water.
- Put this arrangement near a window in a such a way that direct sunlight falls on the mirror (you can also use a powerful torch light).
- Adjust the position of the bowl so that the reflected light from the mirror falls on a wall.
What do you observe?
The mirror and the water combination acts like a prism. It breaks up the light into its colours, i.e. shows the phenomenon of dispersion of light.
Red, blue and green are known as the three primary colours of light.

These are often regarded as the three basic colours in nature. Mixing these colours, in appropriate proportions, gives us all the other colours. The primary colours, when mixed in appropriate proportion, give back white light. Any other colour, produced by mixing two or more primary colours, in proper proportions, is called a composite colour.
Rainbow- A Natural Effect of Dispersion

Most of us must have had a chance of observing a rainbow. We marvel at its beauty and enjoy watching it.
When do we observe a rainbow?
We can get a rainbow if the sun 'comes out, or 'shines' after a rainfall. The drops of water, suspended in air, then disperse the sunlight in much the same way as a glass prism did in Newton's experiments. Rainbow is thus a natural phenomenon associated with dispersion of sunlight.
Lenses
Besides the glass slab and the prism, it is lenses that are used very often for studying, and using, the effects of refraction.
A lens is a portion of a transparent refracting medium bounded by two surfaces. When both, or one of these surfaces are/is spherical, the lens is known as a spherical lens.
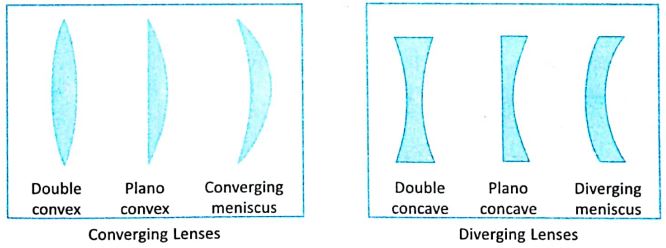
Spherical lenses are of two types:
- Convex, or converging lenses
- Concave, or diverging lenses.
The common shapes of these two types of lenses are shown below.
Definitions of Some 'lens-related' terms
Let us first understand the meanings of a few terms relevant to the lenses.
Centres of Curvature: Each of the two surfaces of a spherical lens can be regarded as a part of a sphere. The centres, of these two spheres, are known as the centres of curvature, of the two surfaces of the lens.
Radii of Curvature: The radii of the two spheres, of which the lens surfaces are a part of, are known as the radii of curvature of the two surfaces of the lens.

Principal Axis: The line joining the centres of curvature of the two surfaces of a lens is known as its principal axis.
Optical Centre: The optical centre of a lens is a special point on its principal axis. A ray of light, passing through the optical centre of a lens, goes straight through it without undergoing any bending, or deviation, from its path.
Principal Focus/Focal Length: It turns out that if a beam of rays, all parallel to the principal axis of a lens, falls on the lens, all such rays either all converge to a point on its principal axis, or appear to diverge from a point on its principal axis. We call this point as the (second) principal focus of the lens.
The distance of the (second) principal focus from the optical centre of a lens equals the (second) focal length of the lens.

Activity 2
To illustrate the focussing action of a convex lens by using it to burn a hole in a piece of black paper.

- Take a convex lens and a piece of black paper. Keep this paper in sunlight.
- Hold a convex lens (preferably one provided with a handle) in the hand and adjust its position so that a well-focussed sharp pointed image of the sun is formed at some point on the black paper itself.
- Hold the lens steadily in this position for some time.
- We will soon observe that the focus point, on the black paper, is burning out and a hole gets created around that point.
The burning occurs because the lens concentrates a large amount of solar energy on a very small area. We use a black paper because black objects are the best absorbers of radiation.
Three Special Rays for Lenses
We can use the ideas and definitions, you read on the previous pages, to draw ray diagrams for lenses. These ray diagrams help us to know the nature,-size and position of the image formed when an object is kept at different distances from the lens. We generally use two of the three (special) incident rays, described below, to draw these ray diagrams.
- An incident ray, parallel to the principal axis, passes through (or appears to come from), the (second) principal focus of the lens.
- An incident ray, passing through the optical centre of the lens, goes undeviated from the lens.
- An incident ray, passing through the (first) principal focus of the lens, or directed towards it, becomes parallel to the principal axis after refraction from the lens.


The principal focus of the lens is really the second focus of the lens and the corresponding focal length is the second focal length.
We also define the first focus and the first focal length of a lens. This is done as follows:
(First) Principal Focus/Focal Length: The (first) principal focus of a lens is a point on its principal axis such that if a ray of light passes through it (for a convex lens), or is directed towards it (for a concave lens), it becomes parallel to the principal axis after refraction by the lens. We call the distance of the (first) principal focus from the optical centre of the lens, as the (first) focal length of the lens. Usually the first and the second focal lengths of a lens are equal to each other. They can, however, be different from each other, in certain situations.

